Background
This was a great opportunity for me to apply human factor knowledge into interaction design. I was both a visual designer and experimental psychologist who created immersive experiences. VELOS, my first VR project, confirmed my interests and goals in creating more experience in virtual reality.
I. Intro
VELOS is a virtual reality application that allows the audience to walk-though the Project VELOS for the Big Idea Conference. We decided to use the first-person experience on the Moon to learn about the Lunar Launcher.
The application is built for Oculus Quest to demonstrate and testing. The team used Unity 3D game engine and XR interaction Toolkit. The application is available to try for free online at Sidequestvr.com.
Type of Project
Big Idea | NASA's Breakthrough, Innovative, and Game-changing (BIG) Idea Challenge (nianet.org)
Presentation and Demostration
My Role
Story Board
Interaction Design
Visual Design
Human Factor evaluation
Script
Tech Support
Unity Game Engine
XR interaction Toolkit
Adobe Illustrator
VR Team
Industrial Designer
Interaction Designer
Engineers
UI/UX designer
Roadmap and Process
The VR team is an extension of the VELOS product team. To ensure the game match the product, we invited the engineers and product managers to our meetings to review and critique the design.
.jpg)
II. Story Line and Plot
The first step was brainstorming the storyboards. The design team drew a lot of storyboards to explore the main ideas of the game. The game is limited to 5-7 minutes long since it's on a conference.
All the designers envisioned the game playing as an astronaut; and we had 2 directions for this game.


Idea A:
The player will interact with the device directly.
The player will interact with be button floating in the space.

Idea B:
The player will interact with a panel during the game.
The dashboard is showing the buttons and launcher.
Most ideas has the player became an astronaut to interact with the launcher. After the brainstorming session, I decided to choose Idea A, and I wrote them into a plot to detail the each stage.
The story board is based on the idea that astronaut landing on the moon to start the mission. While they are settled on the Moon, they will check the Launcher and the probes to finish the mission. At the end, they will receive the data and result about water detection.

Just like the storyline for a movie or short story, the up and down line shows the intensiveness of the each phase.
The Phase III is the climax which is the most intensive part during the game.
The Phase IV is the result and ending of the game that make player feel rewarding.
III. Create Assets
As our plan, one designer creates 3D assets, another designer creates 2D assets, we made two sides of the list to differentiate work easily.

IV. Set Up Environment and Avatar
We made a sketch of the typical moon environment where is dark, silent, and uninhabited. The gravity and the lighting condition have all mimicking the Moon environment to create it more immersive.
The avatar is astronaut, and we used customized astronaut gloves and helmet to create the vivid feeling of in the astronaut suit.
moon environment

Customized Gloves

Gloves 3D View
Dylan is the design engineer in the team. Once he setup the moon environment, we can start to brainstorm the lo-fi story board within the moon surface.
Since the pandemic, we used Miro for brainstorming session, and gather feedbacks.
V. Design the lo-fi Mockups
With the storyboard, we start to design the interaction with panels and buttons. Up four pictures, I created mockups by Adobe Illustrator. The down four pictures were digital sketch from Dylan.

VI. Design the Game Map

We start to think about game map for phases, so that the player will be able to travel but not get lost in the unmanned environment. For the developers, it is easier for us to track and build.
We used display stands at stations to communicate with the player. When the player arrived to the station, the screen will unfold and display the slides so that the information can be display in the order.
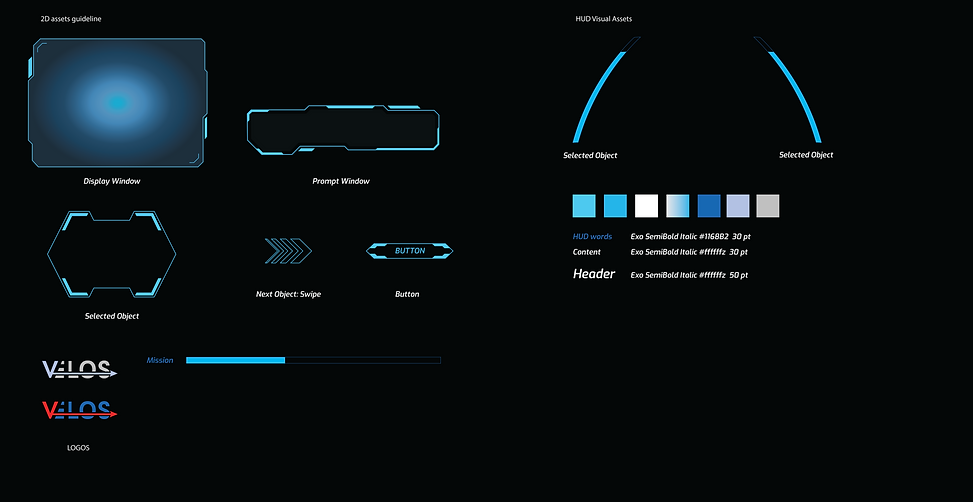
VII. Design Visual System
To start with the visual design, I created a visual system included all the colors and elements to ensure the accessibility and consistency.
-
Guide player with blue ray
-
We decided to use blue light run through the game as a visual guide.
-
Blue is a typical sci-fi style color
-
-
Make it look believable.
-
The element of believability was a key factor in the design.
-
The lighting in the game should be dark, however, spot light on the object player need to focus on.
-
-
Intuitive Guidance
-
The stage is glowing blue ray to guide the player coming over.
-
The number on each stand shows the steps players are at.
-
VIII. Interface Design
Each interface is designed to display the key information. To improve the storytelling and interactivity, we added interactions with each slide.

Design for Phase I
-
Give player time to react and adapt into the setting and environment:
- We used the background music and greeting to invite the player to enter the scene.
-
Introduce the moon environment in an interactive way:
-
Introduce the moon gravity by interacting with a moon rock.
-
-
Prepare for the “Sad Path”:
-
When the player is lost the guidance the background voice should provide hint or reminders to keep the player moving forward.
-
-
The interface is helping player understand the project and the launcher
-
Intuitive Guidance
-
The stage is glowing blue ray to guide the player coming over.
-
The number on each stand shows the steps players are at.
-

Phase 1 Hi-fi Mock-ups
I used Adobe Illustrator to create the Hi-fi Mockups and Developers will integrated on the canvas in Unity.
Design for Phase II
-
The player will witness the lander landing on the moon.
-
We decided the to make this interaction to make the design more interaction.
-
-
We used count down to imitate the launching scene.
-
We got inspired by NASA videos, counted down to "0" in the game.
-


Design for Phase III
-
The interface is a control pad to expand the launcher or turning it with 360° view.
-
The buttons should be easy to understand
-
The flat button is the easiest to control.
- I designed multiple choices for the interface and some of the buttons cannot be implemented.
-

Design for Phase 4
-
The last station is to shoot the probes.
-
The control has to be easy and intuitive
-
We used up and down buttons to control the launcher.
-
-
Far view, close view
-
The product is a farther view and the screen can show both the closer view of the launcher.
-
-
The icons shows the communication status of probes
- Feedback on the dashboard can give the feelings of accomplishment to the player


VIII. Script and Background Music
We decided to use Voice of God to guide the player better. When the player is facing the interface, they are also hearing the content read aloud since it's content heavy.
To easily edit and practice, I host a table reading to practice the game. The recording sent to the product team for critique.

IX. Reflection & Outcome
VELOS is a very challenging project for me. But I am very proud of our group to finish this project with massive research and self teaching.
One of the key of this project is to communicate with engineer team and VR team. Since all the work was finished remotely, looking for the right methods to communicate and demonstrate are key for the team success. We have used Miro for brainstorming, whiteboard to sketch out the interface, table reading to confirm the script and music. The meetings are very effective.
I also learned using human factor knowledge for this project, the attention, the movement, and visual and voice interaction all need to be considered during the game. For this game, I used 3D design tools and 2D design tools to create assets and experiences. To make the game intuitive and immersive we consider the lighting and environment very carefully.

